최근 국내 서비스 중에 OAuth 로그인을 지원하지 않는 서비스가 있을까? 아마 거의 없을 것이다. 이번 프로젝트에도 OAuth2.0을 사용한 로그인 방식을 적용하고자 한다.
OAuth 로그인은 쉽게 말해 '사용자 인증을 다른 기관에 맡기는' 로그인 방식이다. 운영중인 서비스의 서버에 저장된 사용자 정보가 아니라, 다른 신뢰할만한 서비스에 저장되어있는 사용자 정보를 가져와서 사용하는 방식이다. 물론, 해당 과정에서 자체적으로 토큰 발급 등의 인증 / 인가 시스템을 이용하기 위해서는 받아온 사용자 정보를 자체 서버에 저장해야한다.
이번 프로젝트에는 구글, 카카오, 네이버의 소셜 로그인을 제공할 예정이다. 현재 구글과 카카오를 구현 완료하였으며 이번 포스팅에서는 해당 과정을 다룬다.
Spring Security는 기본적으로 구글, 페이스북, 깃허브 등의 소셜 로그인 기능을 제공해준다. 따라서 이들을 사용하는데에는 큰 문제가 없다. 다만 카카오와 네이버와 같은 국내 서비스는 해당 회사에서 제공하는 방법을 활용해야 가능하다. 각각의 방법은 구글에 검색해보면 널리고 널렸으니 찾아보길 바란다.
Spring Security에 OAuth를 적용하기 위해선 build tool에 의존성을 추가해야 한다. Gradle 기준으로는 dependecies에 아래 코드를 추가해야한다.
//OAuth2
implementation 'org.springframework.boot:spring-boot-starter-oauth2-client'
그 다음, 설정파일을 손봐야한다. 나는 yml파일을 사용하고 있으므로 해당 설정 파일을 수정했다.
security:
  oauth2:
    client:
      registration:
        google:
          client-id: ${G_CLIENT_ID}
          client-secret: ${G_CLIENT_SECRET}
          scope:
            - email
            - profile
        kakao:
          client-id: ${KAKAO_CLIENT_ID}
          client-secret: ${KAKAO_CLIENT_SECRET}
          scope:
            - profile_nickname
            - account_email
          redirect-uri: http://localhost:8080/login/oauth2/code/kakao
          client-name: kakao
          authorization-grant-type: authorization_code
          client-authentication-method: POST
      provider:
        kakao:
          authorization-uri: https://kauth.kakao.com/oauth/authorize
          token-uri: https://kauth.kakao.com/oauth/token
          user-info-uri: https://kapi.kakao.com/v2/user/me
          user-name-attribute: id
google은 별로 작성된 내용이 없는데, kakao는 뭐가 길게 작성된 걸 볼 수 있다. Spring Security에서 카카오는 기본 기능으로 제공하지 않으니 필요한 과정을 수행하기 위한 설정을 일일이 해줘야하기 때문이다.
OAuth 로그인이 기본적으로 동작하는 방식은 다음과 같다.

- Resource Owner(사용자)는 Client(서버)에 서비스 사용 요청을 보낸다.
- 여기서 서버를 Client라 부르는 이유는, 실제 사용자의 정보를 제공해주는 써드 파티 입장에선 우리 서버가 Client가 되기 때문이다.
- Client는 써드 파티의 Authorization Server에 Authorization Code를 요청한다.
- 써드 파티는 Resource Owner가 로그인 할 수 있는 창을 띄워준다.
- 로그인이 성공적으로 이뤄지면, 써드 파티에서 서버에 Authorication Code를 전달한다.
- 서버는 지급받은 Authorication Code를 기반으로 써드 파티에 Access Token을 요청한다.
- 이 때 요청하는 Access Token으로 로그인 하고자 하는 사용자의 정보를 받아온다.
- 써드 파티는 Access Token을 서버에 넘겨준다.
- 서버는 써드 파티에 해당 사용자의 자원을 요청하고, 써드 파티는 이를 서버에 넘겨준다.
이렇게 보고나면 yml 파일에 적힌 것들이 어느 정도 이해될 것이다. 하나하나 살펴보면
- client-id : OAuth를 요청하고 싶은 서버의 id값이다. 보통 OAuth API사용할게요~ 하면 써드 파티에서 제공해준다.
- client-secret : 서버의 비밀번호처럼 사용되는 값이다.
- scope : 써드파티로부터 제공받고싶은 정보들을 나타낸다.
- redirect-uri : Authorization Code를 지급 받을 서버의 Uri다.
- Spring Security의 경우 redirect-uri가 고정된 형태다. {baseUrl}/login/oauth2/code/{registrationId}의 형태로 작성해준다.
- 고정되어있다는 것은, Spring Security에서 고정된 uri로 뭔가 요청이 오면 이를 기반으로 기능을 수행해준다는 의미이기도 하다.
- provider ... : 여러 정보들을 제공받기 위한 써드 파티의 uri들을 나타낸다. Spring Security에 기본 적용이 안되어있기 때문에 카카오에서 제공하는 정보들로 작성한다.
조금 더 자세한 내용은 카카오 공식 문서를 살펴보면 된다.
설정을 마쳤으니 구현에 들어가보자. 아쉽게도 OAuth 구현은 TDD방식으로 진행하지 않았는데, 처음 OAuth 를 사용하는 것이다 보니 단순 구현에만도 크게 애를 먹을 것 같아 일단 구현하고, 테스트 방법은 다시 찾아보는 방식으로 진행하고자 했다.
SecurityConfig
@Bean
public SecurityFilterChain filterChain(HttpSecurity http) throws Exception {
    http
            ...
            .and()
            .oauth2Login(oAuth2 -> oAuth2
                    .successHandler(new OAuth2MemberSuccessHandler(memberEntityRepository, successfulAuthenticationProcessor))
                    .userInfoEndpoint()
                    .userService(OAuth2MemberService))
            ...

    return http.build();
}
filterChain에 OAuth관련 설정을 추가해줬다. successHandler는 OAuth인증이 성공했을 시 처리를 담당할 Handler를 등록해준다. userInfoEndPoint는 Spring Secuirty에서 사용할 claim을 설정한다. 두 클래스를 구현해보자.
OAuth2MemberSuccessHandler
public class OAuth2MemberSuccessHandler implements AuthenticationSuccessHandler {

    private final MemberEntitiyRepository memberEntitiyRepository;
    private final SuccessfulAuthenticationProcessor successfulAuthenticationProcessor;

    public OAuth2MemberSuccessHandler(MemberEntitiyRepository memberEntitiyRepository, SuccessfulAuthenticationProcessor successfulAuthenticationProcessor) {
        this.memberEntitiyRepository = memberEntitiyRepository;
        this.successfulAuthenticationProcessor = successfulAuthenticationProcessor;
    }

    @Override
    public void onAuthenticationSuccess(HttpServletRequest request, HttpServletResponse response, Authentication authentication) throws IOException, ServletException {
        CustomOAuth2User oAuth2User = (CustomOAuth2User) authentication.getPrincipal();

        String email = oAuth2User.getEmail();

        MemberEntity memberEntity = memberEntitiyRepository.findByEmail(email).orElseThrow(() ->
                new BusinessException(ExceptionCode.MEMBER_NOT_FOUND));

        successfulAuthenticationProcessor.setCookieInResponseHeader(response, memberEntity);
    }
}
먼저 OAuth2MemberSuccessHandler는 AuthenticationSuccessHandler를 구현한다. 써드파티에서 인증을 진행하고 넘겨준 정보가 필터로 넘어온다는 것은 곧 인증이 성공했다는 뜻이기 때문에 해당 인터페이스를 구현하기로 결정했다.
MemerEntityRepoisotry에서 해당 email로 저장된 회원 정보를 검색해온다. 만일 illegal한 방법으로 OAuth인증을 수행했다면, 해당 이메일로 저장된 계정이 없기 때문에 예외처리할 것이다. 또한, 이미 회원 정보가 테이블에 저장되어있다면 해당 정보를 그대로 사용할 수 있다.
인자로 넘어오는 Authentication은 후술할 OAuth2MemberService에서 제공한 정보를 바탕으로 OAuth2LoginAuthenticationProvier 클래스에서 제공해주는데, 후에 알아보도록 한다.
찾아온 MemberEntity를 기준으로 서버에서 사용할 AccessToken과 RefreshToken을 담은 Cookie를 만들고 이를 ResponseHeader에 담아준다.
OAuth2MemberService
public class OAuth2MemberService extends DefaultOAuth2UserService {

    private final MemberEntityRolesGenerator rolesGenerator;
    private final CustomAuthorityUtils authorityUtils;
    private final MemberEntitiyRepository memberEntitiyRepository;

    public OAuth2MemberService(MemberEntityRolesGenerator rolesGenerator, CustomAuthorityUtils authorityUtils, MemberEntitiyRepository memberEntitiyRepository) {
        this.rolesGenerator = rolesGenerator;
        this.authorityUtils = authorityUtils;
        this.memberEntitiyRepository = memberEntitiyRepository;
    }

    @Override
    public OAuth2User loadUser(OAuth2UserRequest userRequest) throws OAuth2AuthenticationException {
        OAuth2User oAuth2User = super.loadUser(userRequest);

        Map<String, Object> userAttributes = oAuth2User.getAttributes();

        String registrationId = userRequest.getClientRegistration().getRegistrationId();

        OAuthAttributes attributes = OAuthAttributes.of(registrationId, userAttributes);

        String email = attributes.getEmail();
        List<String> roles = rolesGenerator.generateMemberRoles(email, "고객");
        List<GrantedAuthority> authorities = authorityUtils.createAuthorities(roles);

        saveMemberIfNotPresent(email, attributes.getName(), roles, registrationId);
        return new CustomOAuth2User(registrationId, userAttributes, authorities, email);
    }

    private void saveMemberIfNotPresent(String email, String nickName, List<String> roles, String registrationId){
        if(memberEntitiyRepository.findByEmail(email).isEmpty()){
            LocalDateTime createTime = LocalDateTime.now();
            MemberEntity member = MemberEntity.builder()
                    .id(0)
                    .email(email)
                    .nickName(nickName)
                    .roles(roles)
                    .createdAt(createTime)
                    .modifiedAt(createTime)
                    .provider(registrationId)
                    .build();
            memberEntitiyRepository.save(member);
        }
    }
}
해당 메서드를 자세히 살펴보기 전에 먼저 앞서 언급한 OAuth2LoginAuthenticationProvier를 살펴볼 필요가 있겠다.
@Override
public Authentication authenticate(Authentication authentication) throws AuthenticationException {
    OAuth2LoginAuthenticationToken loginAuthenticationToken = (OAuth2LoginAuthenticationToken) authentication;
    // Section 3.1.2.1 Authentication Request -
    // https://openid.net/specs/openid-connect-core-1_0.html#AuthRequest scope
    // REQUIRED. OpenID Connect requests MUST contain the "openid" scope value.
    if (loginAuthenticationToken.getAuthorizationExchange().getAuthorizationRequest().getScopes()
          .contains("openid")) {
       // This is an OpenID Connect Authentication Request so return null
       // and let OidcAuthorizationCodeAuthenticationProvider handle it instead
       return null;
    }
    OAuth2AuthorizationCodeAuthenticationToken authorizationCodeAuthenticationToken;
    try {
       authorizationCodeAuthenticationToken = (OAuth2AuthorizationCodeAuthenticationToken) this.authorizationCodeAuthenticationProvider
             .authenticate(new OAuth2AuthorizationCodeAuthenticationToken(
                   loginAuthenticationToken.getClientRegistration(),
                   loginAuthenticationToken.getAuthorizationExchange()));
    }
    catch (OAuth2AuthorizationException ex) {
       OAuth2Error oauth2Error = ex.getError();
       throw new OAuth2AuthenticationException(oauth2Error, oauth2Error.toString(), ex);
    }
    OAuth2AccessToken accessToken = authorizationCodeAuthenticationToken.getAccessToken();
    Map<String, Object> additionalParameters = authorizationCodeAuthenticationToken.getAdditionalParameters();
    OAuth2User oauth2User = this.userService.loadUser(new OAuth2UserRequest(
          loginAuthenticationToken.getClientRegistration(), accessToken, additionalParameters));
    Collection<? extends GrantedAuthority> mappedAuthorities = this.authoritiesMapper
          .mapAuthorities(oauth2User.getAuthorities());
    OAuth2LoginAuthenticationToken authenticationResult = new OAuth2LoginAuthenticationToken(
          loginAuthenticationToken.getClientRegistration(), loginAuthenticationToken.getAuthorizationExchange(),
          oauth2User, mappedAuthorities, accessToken, authorizationCodeAuthenticationToken.getRefreshToken());
    authenticationResult.setDetails(loginAuthenticationToken.getDetails());
    return authenticationResult;
}
위 메서드는 Spring Security에 구현된 OAuth2LoginAuthenticationProvier클래스에 정의된 인증 메서드다. 앞서 OAuth인증 과정에서 서버에서 써드 파티에 Authorization Code를 요청하고, 받아온 Code를 바탕으로 다시 Access Token을 요청한다고 했음을 기억한다면 코드를 이해하기에 도움이 될 것이다.
받아온 AccessToken에는 써드 파티에 요청할 정보들과 토큰 값이 담겨있다.

해당 정보를 바탕으로 Security 내부에서 써드 파티와 통신해 필요한 정보들을 받아온다.
아무튼 이렇게 길게 받아온 access token은 loadUser를 하기 위해 필요한 파라미터인 OAuthUserRequest를 만드는데도 사용된다. OAuth2MemberService는 DefaultOAuth2UserService를 상속받아 사용한다. 상위 객체의 loadUser를 통해 OAuth2User를 가져오며, 필요한 기능들을 추가로 정의했다. 이렇게 사용한 이유는 사용자가 없을 경우 이를 서버에 저장하고, 추가적으로 Custom한 OAuthUser를 사용하기 위해서다. 반환하는 CustomOAuth2User를 살펴보자.
CustomOAuth2User
public class CustomOAuth2User implements OAuth2User {
    private String registrationId;
    private Map<String, Object> attributes;
    private List<GrantedAuthority> authorities;
    @Getter
    private String email;

    @Override
    public Map<String, Object> getAttributes() {
        return this.attributes;
    }

    @Override
    public Collection<? extends GrantedAuthority> getAuthorities() {
        return this.authorities;
    }

    @Override
    public String getName() {
        return this.registrationId;
    }
}
OAuth2User는 운영하는 서버에서 알아서 구현해서 사용하라고 Spring Security가 Interface로 추상화 시켜놓았다. 안에는 특별한 건 없는데, 어떤 써드 파티를 이용하는지를 나타내는 registrationId, 사용자 정보가 담길 attributes, 권한 정보가 담긴 authorities가 있다. Service 코드에서 authorities는 기본적으로 고객만 가능하도록 만들었으며, registrationId와 attributes는 받아온 정보를 그대로 사용함을 확인할 수 있다.
OAuthAttributes
@Getter
public class OAuthAttributes {

    private static final String GOOGLE_ATTRIBUTE_NAME = "sub";
    private static final String KAKAO_NAVER_ATTRIBUTE_NAME = "id";

    private final Map<String, Object> attributes;     // OAuth2 반환하는 유저 정보
    private final String nameAttributesKey;
    private final String name;
    private final String email;
    private final String profileImageUrl;

    @Builder
    public OAuthAttributes(Map<String, Object> attributes, String nameAttributesKey,
                           String name, String email, String profileImageUrl) {
        this.attributes = attributes;
        this.nameAttributesKey = nameAttributesKey;
        this.name = name;
        this.email = email;
        this.profileImageUrl = profileImageUrl;
    }

    public static OAuthAttributes of(String socialName, Map<String,Object> attributes){
        if(socialName.equals("kakao")){
            return ofKakao(attributes);
        }
        if(socialName.equals("google")){
            return ofGoogle(attributes);
        }
        if(socialName.equals("naver")){
            return ofNaver(KAKAO_NAVER_ATTRIBUTE_NAME, attributes);
        }
        throw new BusinessException(ExceptionCode.INVALID_OAUTH_LOGIN);
    }

    private static OAuthAttributes ofNaver(String id, Map<String, Object> attributes) {
        return null;
    }

    private static OAuthAttributes ofGoogle(Map<String, Object> attributes) {
        return OAuthAttributes.builder()
                .name(String.valueOf(attributes.get("name")))
                .email(String.valueOf(attributes.get("email")))
                .profileImageUrl(String.valueOf(attributes.get("picture")))
                .attributes(attributes)
                .nameAttributesKey(GOOGLE_ATTRIBUTE_NAME)
                .build();
    }

    private static OAuthAttributes ofKakao(Map<String, Object> attributes) {
        Map<String, Object> kakaoAccount = (Map<String, Object>)attributes.get("kakao_account");
        Map<String, Object> kakaoProfile = (Map<String, Object>)kakaoAccount.get("profile");

        return OAuthAttributes.builder()
                .name((String) kakaoProfile.get("nickname"))
                .email((String) kakaoAccount.get("email"))
                .attributes(attributes)
                .nameAttributesKey(KAKAO_NAVER_ATTRIBUTE_NAME)
                .build();
    }
}
써드 파티에서 제공하는 정보는 각 회사마다 당연히 다르다. 따라서 주어지는 정보(Attribute)들을 하나의 객체로 추상화 해 사용하면 더 좋겠다. 이를 추상화한 클래스가 OAuthAttributes다. 아직 네이버는 적용하지 않아서 비어있음을 감안해달라.
뭐 정보는 그대로 있다고 보면 된다. 특이점이라면 profileImageUrl인데, 지금 당장은 프로필 사진을 사용하지 않지만 추후 S3와 연동을 통해 서버에 저장하는 사용자도 프로필 사진 적용이 가능하게 기능을 구현하면서 사용할 예정이라 넣어놨다.
내부 구현은 여기까지다. 이제 OAuth 로그인이 잘 되는지 테스트해봐야 할 것이다. 테스트를 Postman으로는 진행하기 좀 어려운데, 중간에 redirect가 끼어있기 때문이다. 따라서 대신 간단한 테스트용 페이지를 하나 만들어서 테스트를 진행했다.
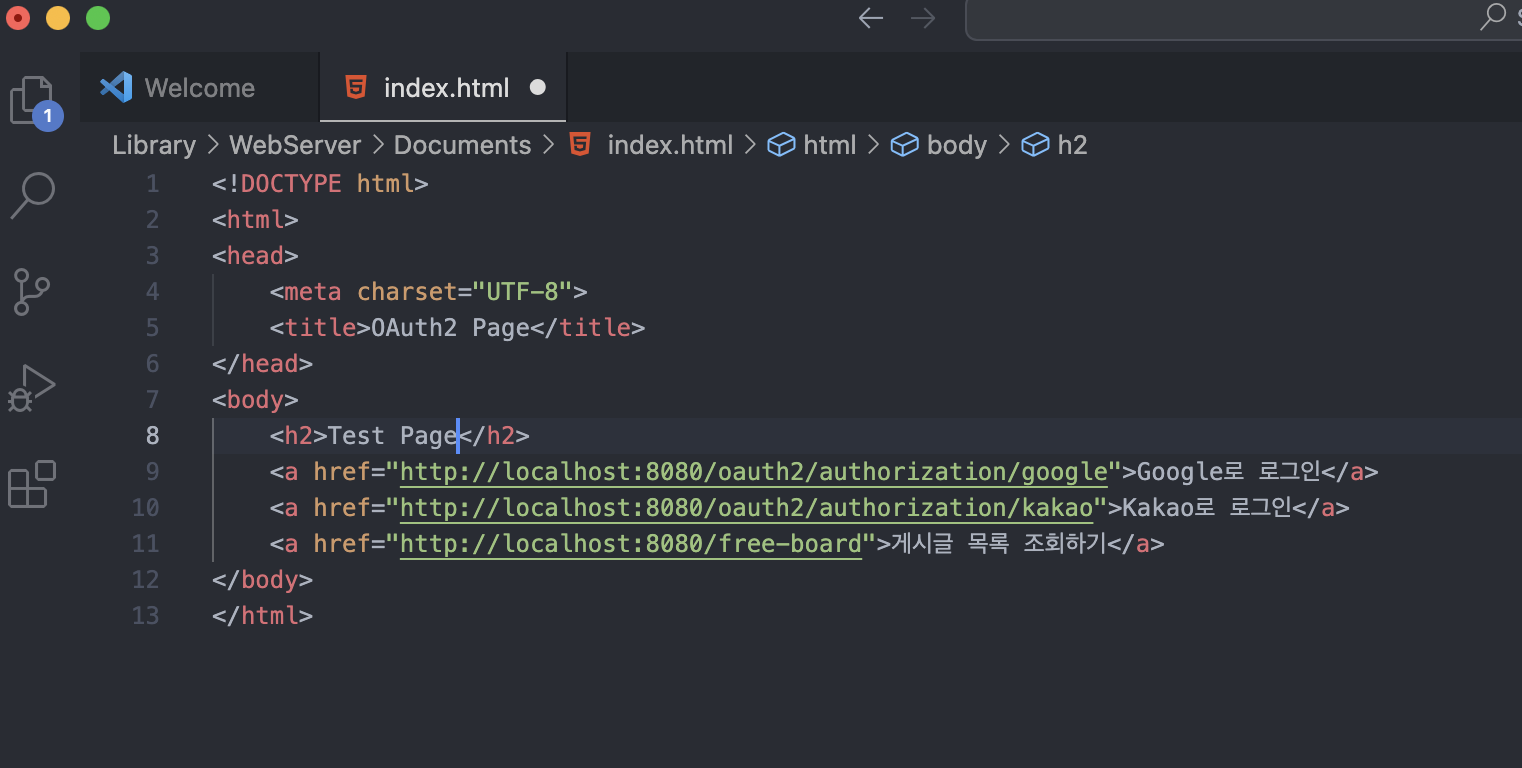

위와 같이 간단하게 테스트 페이지를 만들고, free-board로 보내는 GET요청에 고객권한이 필요하도록 임시로 설정했다. OAuth 로그인 요청을 보내는 URL도 확인할 수 있다. {baseUrl}/oauth2/authorization/{registrationId}의 형태다.

로그인하지 않은 사용자가 게시글 목록을 조회하면 403 Forbidden이 발생한다.

이제 OAuth로그인 요청을 보내봐야 한다. OAuth로그인이 성공적으로 수행되면 쿠키에 JWT가 담겨올 것이다. 로그인을 수행하기 전엔 쿠키가 비어있다.


구글 로그인 요청을 보내면, OAuth로그인이 성공해 쿠키에 토큰이 담겨온다. 이제 게시글 조회 요청을 다시 보내보자.

게시글 목록 조회 요청에 성공했다.
지금까지 OAuth 로그인을 적용해보았다. TDD방식을 적용하지 못 해 OAuth 자체를 테스팅해보고 싶은 마음이 큰데, 좀 더 찾아보고 기회가 되면 포스팅하도록 하겠다.
전체 코드는 링크에서 확인할 수 있다.
'Programming > TDD Project' 카테고리의 다른 글
| Pull Request 030. 바버샵 등록 기능 구현하기 - Slack WebHook 연동 및 비동기 이벤트 처리 해보기 + 계층 간 통신 고민하기 (0) | 2024.05.20 |
|---|---|
| Pull Request 029. Record를 적용한 리팩토링 진행하기 (0) | 2024.04.18 |
| Pull Request 027. 로그인 / 로그아웃 로직 리팩토링하기 - Http Header 대신 Cookie를 사용해보자 (0) | 2024.01.09 |
| Pull Request 026. 자유 게시글 테스트 코드를 리팩토링하며 느낀 점 (0) | 2023.12.29 |
| Pull Request 025. 회원 도메인을 향한 의존은 어디에 존재해야 할까? - 게시글 수정 기능 리팩토링 (0) | 2023.12.18 |


댓글